Title: Microsoft
Dynamics AX to Enterprise Data Warehouse (EDW) SQL Extract Transform and Load
(ETL):
Author: Toraj
Khavari
Date: November
23, 2015
Objective: ETL,
Extracting meaningful data from Microsoft Dynamics AX, applying minimum series
of rules to Transform the source data, and Loading the data in an Enterprise
Data Warehouse (EDW), as fast as possible are among the primary first steps for
an effective and successful Business Intelligent (BI) solution collection. This
article will outline a practical Microsoft Dynamics AX to EDW SQL Server
Integration Services (SSIS) ETL.
Article Body:
There
are multiple design patterns and architecture strategies to achieve ETL between
AX and EDW SQL environments. The design and architecture methods outlined in this
article by no means claim to be the best or only way. It is a practical design
which meets basic ETL requirements.
In
our case, the high level business requirements for the ETL between AX and EDW
SQL are as follows.
- Must
be as fast as possible with minimum impact on the source
- Shall
have high quality and tractable
- Must
support EDW truncate and incremental load tables
- Support
scalability and easy maintenance
To
meet the above requirements the solution collection are as follows.
1)
Navigate
to the SQL Server, start the Microsoft SQL Server Management Studio, and create
a new SQL Database (DB) called “Staging”.
CREATE DATABASE Staging
2)
In
the “Staging” DB insert a “ControlIncremental” table. The “ControlIncremental”
keeps track of the source tables ETL names. It contains when the last ETL
loaded and prior load were performed. Will be a great source for incremental
loads and audit. Insert sample code as follows.
USE [Staging] -- Identify the DB
GO
INSERT INTO [dbo].[ControlIncremental] -- Identify the table
([ETLLoadDateTime] -- ETL load data and time, default can be 1900-01-01
00:00:00.0000000
,[SourceTableName]
-- Source table name
,[PriorETLLoadDateTime])
-- The prior date and time stamp, default can be
1900-01-01 00:00:00.0000000
VALUES
(<ETLLoadDateTime, datetime2(7),>
,<SourceTableName, varchar(100),>
,<PriorETLLoadDateTime, datetime2(7),>)
GO
Hint
·
When
adding new tables for ETL, insert a new row in the “ControlIncremental” Sample
code as follows.
insert
into
[Staging].[dbo].[ControlIncremental] values ('1900-01-01 00:00:00.0000000', '<Your New ETL Table>', null)
·
If
you would like to truncate and load the Staging table, change the
“ControlIncremental” “ETLLoadDateTime” column to default date.
UPDATE [Staging].[dbo].[ControlIncremental]
set [ETLLoadDateTime]='1900-01-01 00:00:00.0000000' where [SourceTableName]='<Your New ETL Table>'
·
You
can create the table with the following code, too. It is a bit easier.
USE [Staging]
GO
/****** Object:
Table [dbo].[ControlIncremental]
Script Date: 11/23/2015 8:06:56 AM ******/
SET ANSI_NULLS ON
GO
SET QUOTED_IDENTIFIER ON
GO
SET ANSI_PADDING ON
GO
CREATE TABLE [dbo].[ControlIncremental](
[ETLLoadDateTime]
[datetime2](7) NULL,
[SourceTableName]
[varchar](100) NULL,
[PriorETLLoadDateTime]
[datetime2](7) NULL
) ON [PRIMARY]
GO
SET ANSI_PADDING OFF
GO
3)
An
audit table will be paramount to production support, route cause analysis, and
auditing. Designing audit tables is dependent on the business needs,
environments, and experience. The following audit table seems to be meeting our
needs at the present time. In the “Staging” DB insert a “DimAudit” table.
USE [Staging] -- Identify the DB
GO
INSERT INTO [dbo].[DimAudit] --
Identify the table
([ParentAuditKey] --
Unique parent audit key to identify a task's parent
-- if appropriate,
otherwise 0
,[TableName] --
DB table name
,[PkgName] -- Package name - mostly SQl SAS package
,[PkgGUID] -- Package unique GUID identifier
,[PkgVersionGUID] --
Package version unique GUID identifier
,[PkgVersionMajor] --
Package version major identifier
,[PkgVersionMinor] --
Package version minor identifier
,[ExecStartDT] -- Execution start date and time stamp
,[ExecStopDT] -- Execution stop date and time stamp
,[ExecutionInstanceGUID]
--
Execution instance unique GUID identifier
,[ExtractRowCnt] --
Execution row count
,[InsertRowCnt] -- Insert row count
,[UpdateRowCnt] --
Update row count
,[ErrorRowCnt] --
Error row count
,[TableInitialRowCnt] --
Table initial row count
,[TableFinalRowCnt] --
Table final row count
,[TableMaxSurrogateKey] --
Table maximum surrogate key. A surrogate key in a
-- database is a
unique identifier for either an
-- entity or an
object.
,[SuccessfulProcessingInd] --
This and the following columns contain 'Y'
[DummyProductKeyAdded] -- or 'N'. They indicate successful flag 'Y'.
,[DummyCustomerKeyAdded]
,[DummyLOBKeyAdded]
,[DummyGlobalSalesKeyAdded]
,[DummySalesChannelKeyAdded])
VALUES
(<ParentAuditKey, int,>
,<TableName, nvarchar(50),>
,<PkgName, nvarchar(50),>
,<PkgGUID, uniqueidentifier,>
,<PkgVersionGUID, uniqueidentifier,>
,<PkgVersionMajor, smallint,>
,<PkgVersionMinor, smallint,>
,<ExecStartDT, datetime,>
,<ExecStopDT, datetime,>
,<ExecutionInstanceGUID, uniqueidentifier,>
,<ExtractRowCnt, bigint,>
,<InsertRowCnt, bigint,>
,<UpdateRowCnt, bigint,>
,<ErrorRowCnt, bigint,>
,<TableInitialRowCnt, bigint,>
,<TableFinalRowCnt, bigint,>
,<TableMaxSurrogateKey, bigint,>
,<SuccessfulProcessingInd, nchar(1),>
,<DummyProductKeyAdded, char(1),>
,<DummyCustomerKeyAdded, char(1),>
,<DummyLOBKeyAdded, char(1),>
,<DummyGlobalSalesKeyAdded, char(1),>
,<DummySalesChannelKeyAdded, char(1),>)
GO
Add
the Primary Key “AuditKey” to “DimAudit” table. It is a unique audit key to
identify a task
ALTER TABLE [Staging].[dbo].[DimAudit] add PRIMARY KEY AuditKey INT NOT NULL DEFAULT '0' AUTO_INCREMENT
Identify
the “ParentAuditKey” as a foreign key in the “DimAudit” table.
ALTER TABLE [Staging].[dbo].[DimAudit] add FOREIGN KEY (ParentAuditKey)
Hint
·
You
can create the table with the following code, too. It is a bit easier.
USE [Staging]
GO
/****** Object:
Table [dbo].[DimAudit ******/
SET ANSI_NULLS ON
GO
SET QUOTED_IDENTIFIER ON
GO
SET ANSI_PADDING ON
GO
CREATE TABLE [dbo].[DimAudit](
[AuditKey] [int] IDENTITY(1,1) NOT NULL,
[ParentAuditKey]
[int] NOT NULL,
[TableName]
[nvarchar](50) NOT NULL,
[PkgName] [nvarchar](50) NOT NULL,
[PkgGUID] [uniqueidentifier]
NULL,
[PkgVersionGUID]
[uniqueidentifier]
NULL,
[PkgVersionMajor]
[smallint] NULL,
[PkgVersionMinor]
[smallint] NULL,
[ExecStartDT]
[datetime] NOT NULL,
[ExecStopDT]
[datetime] NULL,
[ExecutionInstanceGUID]
[uniqueidentifier]
NULL,
[ExtractRowCnt]
[bigint] NULL,
[InsertRowCnt]
[bigint] NULL,
[UpdateRowCnt]
[bigint] NULL,
[ErrorRowCnt]
[bigint] NULL,
[TableInitialRowCnt]
[bigint] NULL,
[TableFinalRowCnt]
[bigint] NULL,
[TableMaxSurrogateKey]
[bigint] NULL,
[SuccessfulProcessingInd] [nchar](1) NOT NULL,
[DummyProductKeyAdded]
[char](1) NOT NULL,
[DummyCustomerKeyAdded]
[char](1) NOT NULL,
[DummyLOBKeyAdded]
[char](1) NOT NULL,
[DummyGlobalSalesKeyAdded] [char](1) NOT NULL,
[DummySalesChannelKeyAdded] [char](1) NOT NULL,
CONSTRAINT [PK_dbo.DimAudit]
PRIMARY KEY CLUSTERED
(
[AuditKey] ASC
)WITH (PAD_INDEX = OFF, STATISTICS_NORECOMPUTE = OFF, IGNORE_DUP_KEY = OFF, ALLOW_ROW_LOCKS = ON, ALLOW_PAGE_LOCKS = ON) ON [PRIMARY]
) ON [PRIMARY]
GO
SET ANSI_PADDING OFF
GO
ALTER TABLE [dbo].[DimAudit] ADD DEFAULT ('Unknown') FOR [TableName]
GO
ALTER TABLE [dbo].[DimAudit] ADD DEFAULT ('Unknown') FOR [PkgName]
GO
ALTER TABLE [dbo].[DimAudit] ADD DEFAULT (getdate()) FOR [ExecStartDT]
GO
ALTER TABLE [dbo].[DimAudit] ADD DEFAULT ('N') FOR [SuccessfulProcessingInd]
GO
ALTER TABLE [dbo].[DimAudit] ADD DEFAULT ('N') FOR [DummyProductKeyAdded]
GO
ALTER TABLE [dbo].[DimAudit] ADD DEFAULT ('N') FOR [DummyCustomerKeyAdded]
GO
ALTER TABLE [dbo].[DimAudit] ADD DEFAULT ('N') FOR [DummyLOBKeyAdded]
GO
ALTER TABLE [dbo].[DimAudit] ADD DEFAULT ('N') FOR [DummyGlobalSalesKeyAdded]
GO
ALTER TABLE [dbo].[DimAudit] ADD DEFAULT ('N') FOR [DummySalesChannelKeyAdded]
GO
ALTER TABLE [dbo].[DimAudit] WITH CHECK ADD CONSTRAINT [FK_dbo_DimAudit_ParentAuditKey] FOREIGN KEY([ParentAuditKey])
REFERENCES [dbo].[DimAudit] ([AuditKey])
GO
ALTER TABLE [dbo].[DimAudit] CHECK CONSTRAINT [FK_dbo_DimAudit_ParentAuditKey]
GO
4)
The
“ControlIncremental” and “DimAudit” are fundamental ETL tracking and audit
tables. After the above steps, SQL packages are needed to ETL tables. Microsoft
Visual Studio (VS) has powerful Business Intelligence (BI) tools. You can configure
the Microsoft Visual Studio and SQL BI project by following the “Visual Studio and SQL Business Intelligence”
article.
5)
In
the VS create a BI Integration Services project, in my case, is called
“EDWSSIS_Extract”. The default “Connections Managers” and “SSIS Packages” will
help to organize the components. In the “Connections Managers” add “New
Connection Manager” and test their connections. E.g., “EDWStaging.conmgr” and
“AXSourceDB.conmgr”.
6)
In
the VS “SSIS Packages” add a new SSIS Package. In our case let us build a
“BOM.dtsx”. To build the “BOM” package (ETL from AX to Staging)), let us break
it to three sections.
a.
Prepare
for table extraction - Pre Extract from Trxn System
b.
Perform
the table extract - Extract from Trxn System
c.
Validate
the quality of the table extraction - Post Extract from Trxn System.
In the
prior sections, “ControlIncremental” and “DimAudit” tables were outlined. In
the VS Variables window add the following variables to the “BOM.dtsx”. They
will be used in the subsequent sections.
Hint
·
If
you do not see the VS’s Variables window, navigate to the VS’s Toolbar >
View > Other Windows > Select Variables.
7)
Prepare
for table extraction - Pre Extract from Trxn System. Prepare for the extraction
to achieve the following goals which we will explore in detail.
a.
Set
incremental time
b.
Get
the last successful execution date and time
c.
Get
the prior row count
d.
Truncate
the staging table and
e.
Get
the Audit Key.
The
following diagram describes the above components for the “BOM” table ETL,
pictorially.
a.
Set
incremental time. From the VS’s SSIS Toolbox add an “Expression Task”. Modify
its Name to “Set Incremental To Time” in the property window. I) Edit the “Set
Incremental To Time” 2) Open the “Variables and Parameters” 3) Add the
“@[User::IncrementalToTime]=getdate()” Expression, 4) Select “Evaluate the
Expression”, and 5) Select “Ok”.
b.
Get
the last successful execution date and time. From the VS’s SSIS Toolbox add
“Execute SQL Task”. Rename it to “Get LastSuccessfulExtractDateTime”. Connect
“Set Incremental To Time” and “Get LastSuccessfulExtractDateTime”. 1) Edit the
“Get LastSuccessfulExtractDateTime”. 2) In the “General” tab, “SQL Statement”,
select the “…’, and copy / paste the following statements. Select “OK” two
times.
SELECT MAX(ETLLoadDateTime) AS
LastSuccessfulExtractDateTime
FROM ControlIncremental
WHERE SourceTableName = 'BOM'
Select “Result Set” and add the
“User::IncrementalFromTime” to “Variable Name”.
c.
Get
the prior row count. From the VS’s SSIS Toolbox add “Execute SQL Task”. Rename
it to “Prior RowCnt”. Follow the previous steps. This time copy / paste the following
statement.
SELECT COUNT(*) AS RowCnt FROM BOM
Select “Result Set” and add the
“User::RowCount” to “Variable Name”.
d.
Truncate
the staging table. From the VS’s SSIS Toolbox add “Execute SQL Task”. Rename it
to “Truncate Staging”. Follow the previous steps. This time copy / paste the
following statement.
TRUNCATE
TABLE BOM
There are no “Result Set” in this case.
e.
Get
the Audit Key. From the VS’s SSIS Toolbox add “Execute SQL Task”. Rename it to
“Get AuditKey”. Follow the previous steps. This time copy / paste the following
statement.
INSERT
INTO [DimAudit]
(ParentAuditKey
,[TableName]
,[PkgName]
,[ExecStartDT]
,[ExecStopDT]
,[ExtractRowCnt]
,[InsertRowCnt]
,[UpdateRowCnt]
,[ErrorRowCnt]
,[TableInitialRowCnt]
,[TableFinalRowCnt]
,[TableMaxSurrogateKey]
,[SuccessfulProcessingInd])
VALUES
(? ,'BOM' ,? ,getdate()--@StartTime,NULL,NULL ,NULL ,NULL
,NULL ,? ,NULL ,NULL ,'N')
SELECT
CAST(SCOPE_IDENTITY() AS INT) AS AuditKey
Go
Select “Result Set” and add the
“User::AuditKey” to “Variable Name”.
8)
Perform
the table extract - Extract from Trxn System. From the VS’s SSIS Toolbox add
“Data Flow Task”. Rename it to “Extract from Trxn System”. Connect “Get
AuditKey” to “Extract from Trxn System”. Edit the “Extract from Trxn System”.
Henceforth, “Data Flow” tab will be the design canvas for this section. The
objective is to extract the data as fast as possible. If failed try it one more
time a bit slower and more methodical, and finally if needed log errors. The
following workflow attains the objectives which we will explore, individually.
a.
AX
Source Table connection and identification
b.
RC_Xtrct,
Row Count Extract
c.
Derived
Column
d.
Staging
Bulk Table Insert
e.
Staging
Row by Row Insert
f.
RC_Error,
Row Count Error
g.
Staging
Error Table Insert
The
following diagram describes the above components for the “BOM” table ETL,
pictorially.
a.
AX
Source Table connection and identification. Add an “OLE DB Source” from SSIS
Toolbox to the Data Flow canvas, and rename it to “AX Source Table”. Edit the
“AX Source Table” 1) Select “Connection Manager” 2) For the “OLE DB connection
manager:” select “AXSourceDB”, 3) In the “Data access mode:” select “SQL
command” and 4) Copy / paste the following code in the “SQL command text:” The
complete “SELECT” statement can be generated from the source data base by selecting
the “BOM” table and viewing the 1st 1000 rows.
SELECT
[LINENUM]
,[BOMTYPE]
,[BOMCONSUMP]
,[ITEMID]
…
…
…
,[RECVERSION]
,[PARTITION]
,[RECID]
FROM [dbo].[BOM]
5)
Select the “Columns’. Validate all the “External Column” rows are mapped to
“Output Column” rows, accurately.
Select “Error Output”. Validate the “Error” column is set to “Fail
component”. Select “Fail component” for the “Set this value to selected cells”
field.
Hint
·
I
encourage you to use table’s column names in the “SQL command text:” field.
Column specification will assist debugging and production support. Data source
column deprecations and changes will be detected during early stages of ETL.
b.
RC_Xtrct,
Row Count Extract. Add a “Row Count” from SSIS Toolbox to the Data Flow canvas.
Rename it to “RC_Xtrct”. Connect “AX Source Table” and “RC_Xtrct”. Edit the
“RC_Xtrct” and select “User:RC_Xtrcat” for the “Variable”.
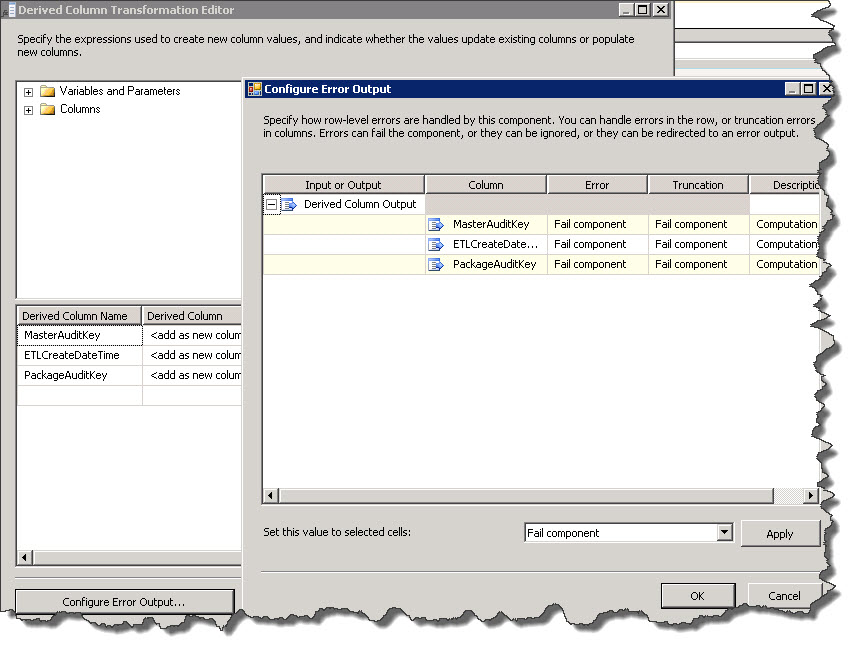
c.
Derived
Column. Add a “Derived Column” from SSIS Toolbox to the Data Flow canvas. Edit
the “Derived Column” and construct the “MasterAuditKey”, “ETLCreateDateTime”,
and “PackageAuditKey” in the “Derived Column Name” column. The following
picture describe the “Derived Column”, “Expression” and “Data Type”,
pictorially.
Select
the “Configure Error Output” button. Select “Full component” for the “Set this
value to selected cells:” field. Validate the “Input or Output”, “Column”,
“Error”, and “Description” values.
At this
point, we have identified the source table, keep track of the row counts, and
three derived columns.
d.
Staging
Bulk Table Insert. Get the information as soon as possible from the source to
destination. Add an “OLE DB Destination” from “SSIS Toolbox” to the “Data Flow”
canvas. Rename it to “Staging Bulk Table Insert”. Connect the “Derived Column
Name” to “Staging Bulk Table Insert”. Edit the “Staging Bulk Table Insert”. 1)
Select “Connection Manager”. 2) In the “OLE DB connection manager:” select
“EDWStaging”. “EDWStaging” is the destination DB. 3) For the “Data access
mode:” select “Table or view – Fast load”. 4) In the “Name of the table of the
view:” select the “BOM” table. 5) Check the “Table lock”. 6) Check the “Check
constrains:”. 7) Set the “Row per batch:” to a reasonable large number. In this
case 10,000 is reasonable. 8) Set the “Maximum insert column size:” to a
reasonable number. “Row per batch:” and “Maximum insert column size:” can be
different. 9) Select the “Mappings”. Make sure all the rows are mapped, correctly.

Select
the Error Output. 1) Confirm the “Error” is set to “Redirect row”. 2) Select
“Fail component” for “Set this value to selected cells:” field. The selection
enables error handling which we will cover in the next steps.
e.
Staging
Row by Row Insert. If the step 8d, “Staging Bulk Table Insert”, fails. We will
try once more to ETL the information one row at a time. This step is slower. In
addition, it will show data integrity issues, if any. Repeat step 8d, except,
1) Rename the “OLE DB Destination” to “Staging Row by Row Insert”, and 2) set
the “Data access mode:” to “Table or view” value.
f.
RC_Error,
Row Count Error. Repeat section 8b, “RC_Xtrct, Row Count Extract”. This time
select “RC_Error” for “Variable”.
g.
Staging
Error Table Insert. By now we have tried in two steps to ETL the data. At this
point, we need to log an issue, and stop. Repeat step 8e, “Staging Row by Row
Insert”. Rename the “OLE DB Destination” to “Staging Error Table Insert”.
Select a new table for “Name of the table or the view:” called “BOMError”.
The
“Error” value in this case is “Ignore Failure”.
In
the SQL Server Management Studio examine the “BOMError” table. It is “BOM”
table with a few added column for error reporting.
9)
Validate
the quality of the table extraction - Post Extract from Trxn System. In this
section we examine the quality of the ETL. It contains 5 components.
a.
Post
RowCnt. Get the total row counts. Add “Execute SQL Task” from SSIS Toolbox to
the “Control Flow” design canvas. Rename it to “Post RowCnt“. Connect the
“Extract from Trxn System” and “Post RowCnt”. Edit the “Post RowCnt”. In the
“General” tab, “SQL Statement” copy and paste the following SQL statement.
SELECT COUNT(*) AS RowCnt FROM BOM
Select
“Result Set”, add a “Result Name” “0” and “Variable Name” ”User::ProdCount”.
Select
the “Expressions” and validate the “Expression” to be as follows.
"SELECT
COUNT(*) AS RowCnt FROM "+ @TableName
b.
Add
a “Script Task” from “SSIS Toolbox”. Rename it to “DQ Continue” and connect it
to “Post RowCnt”. 1) In the “Script” “ReadOnlyVariables” select the following
variables.
User::ProdCount,
User::ProdLowLimit,
User::RC_Xtrct,
User::RowCount,
User::XtrctLowLimit
2)
In the “ReadWriteVariables” select the following item.
bXtrctOK
Select
the “Edit Script…” button. There must be a code supporting the “DQ Continue”
functions.
In
VS create a VB project “VstaProjects”. Add “ScriptMain.vb” class. Copy and past
the following code in the class.
' Microsoft SQL Server Integration Services Script Task
' Write scripts using Microsoft Visual Basic
' The ScriptMain class is the entry point of the Script
Task.
Imports System
Imports System.Data
Imports System.Math
Imports
Microsoft.SqlServer.Dts.Runtime
<Microsoft.SqlServer.Dts.Tasks.ScriptTask.SSISScriptTaskEntryPointAttribute> _
<System.CLSCompliantAttribute(False)> _
Partial Public Class ScriptMain
Inherits
Microsoft.SqlServer.Dts.Tasks.ScriptTask.VSTARTScriptObjectModelBase
Enum ScriptResults
Success
= Microsoft.SqlServer.Dts.Runtime.DTSExecResult.Success
Failure
= Microsoft.SqlServer.Dts.Runtime.DTSExecResult.Failure
End Enum
Public Sub Main()
'
' This is so simple. We could have put the logic in the
precedence constraint
' itself, using the SSIS expression language. But it's
nicer to do it here.
'
Dim ProdCount As Integer = CType(Dts.Variables("ProdCount").Value, Integer)
Dim ProdLowLimit As Integer = CType(Dts.Variables("ProdLowLimit").Value, Integer)
Dim RC_Xtrct As Integer = CType(Dts.Variables("RC_Xtrct").Value, Integer)
Dim XtrctLowLimit As Integer = CType(Dts.Variables("XtrctLowLimit").Value, Integer)
Dim RowCount As Integer = CType(Dts.Variables("RowCount").Value, Integer)
' If
ProdCount > ProdLowLimit AndAlso RC_Xtrct > XtrctLowLimit Then
If ProdCount = RowCount Then
Dts.Variables("bXtrctOK").Value
= True
'MsgBox(CType(Dts.Variables("ProductDCnt").Value,
Integer))
End If
Dts.TaskResult = ScriptResults.Success
End Sub
End Class
c.
Add
a “Execute SQL Task” from “SSIS Toolbox”. Rename it to “Update Control Table”.
Connect the “DQ Continue” and “Update Control Table”. In the “General” “SQL
Statement” add the following SQL statements.
update
[dbo].[ControlIncremental]
set ETLLoadDateTime=?
where SourceTableName=?
In
the “Parameter Mapping” map the “User::IncrementalToTime” and “” as follows
“User::TableName”. Set the “Parameter Size” to -1.
In
this case there are no “Result Set”.
d.
Add
an “Execute SQL Task” and rename it to “Update AuditDim row”. Connect “Update
Control Table” and “Update AuditDim row”. Edit the “Update AuditDim row”. In
the “General” “SQL Statement” copy and paste the following SQL statements.
UPDATE
[DimAudit]
SET
ExecStopDT = getdate()
,TableFinalRowCnt
= ?
,ErrorRowCnt
= ?
,
ExtractRowCnt =?
,SuccessfulProcessingInd='Y'
WHERE
AuditKey = ?
In
the “Parameter Mapping” map the variables described below.
In
this case there are no “Result Set”.
e.
“BAD”,
the script has thrown exception will be discussed in the following section.
10) Exception
handling. The package has thrown exception. Exception handling can be as simple
or as elaborate you would like. In this case, there are three components.
a.
Update
AudiDim row (fail)
b.
Notify
Operator
c.
Fail
Package!
a.
Update
AuditDim row (fail). Add an “Execute SQL
Task” from “SSIS Toolbox” to the “Control Flow” design canvas. Rename it to
“Update AuditDim row (fail)”. Connect “DQ Continue” and “Update AuditDim row
(fail)”. In the “General” tab “SQL Statement” copy and paste the following SQL
code.
UPDATE
[dbo].[DimAudit]
SET
ExecStopDT = SYSDATETIME()
, ExtractRowCnt = @RC_Xtrct
,TableFinalRowCnt = @RowCount
,ErrorRowCnt = @RC_Error
,SuccessfulProcessingInd='N'
WHERE
AuditKey = @AuditKey
Select “Parameter Mapping” and
map the “User::RowCount”, “User::RC_Error”, “User::AuditKey”, and “User::RC_Xtrct”.
In this case there are no
“Result Set”.
b.
Notify
Operator. Add a “Send Mail Task” from “SSIS Toolbox” to the to the “Control
Flow” design canvas. Rename it to “Notify Operator”. Connect “Update AuditDim
row (fail)” and “Notify Operator”.
Complete the “General” and “Mail” tabs.
c.
Fail
Package! Add a “Script Task” from “SSIS Toolbox” to the to the “Control Flow”
design canvas. Rename it to “Fail Package!”. Connect “Notify Operator” and
“Fail Package!”. Custom Basic and C# application can be executed from here.
You
package is ready. Build your solution and test it form VS.
Hint
·
There
is a good amount of work to create a quality SSIS ETL package. However, if you
design it once, thereafter, copy the package for the subsequent ETL packages. A
few object rename, variable changes, and schema enhancements, will get you a
new ETL package.
·
After
copying a package to use for another table ETL, first modify the “Variable”
> “Table Name”. It will assist the subsequent steps, significantly.
My
spacial thanks to Steve Moss and his involvement in this project.
This
was a long wiki article and covered a lot of material. Enjoy coding and have
fun with SQL.
Cheers,
Toraj
References: