Title: Microsoft Dynamics AX
Transactional Data ETL to EDW staging:
Author: Toraj Khavari
Date: February 27, 2017
Objective: Outline an incremental
Extract Transform and Load (ETL) from Microsoft Dynamics AX Transactional
SysDataBaseLog table to Enterprise Data Warehouse (EDW) Staging Data Base (DB).
Article Body: Our Company’s
Sr. Finance Manager has a business requirement to have access to Microsoft
Dynamics AX Transactional sales data, beginning 4Q2015. When I started my EDW
architecture responsibility, no matter what we did to get the AX Tables, it
always missed some transactional information during ETL logic, Cube and Power
BI analysis. AX SysDataBaseLog table has a rich set of event driven
transactional data. It details every change for a given sales. The
SysDataBaseLog is large and ever growing. Therefore, the ETL performance
requirements became very important. In addition, the system solution must be fault
tolerant to insure accurate data transfer between source and destination. To
meet the performance ETL and robustness requirements, I will outline an
incremental data ETL pattern with a vital error handling ability.
System
Specification: Microsoft Dynamics AX 2012 R2
SQL
Environment: SQL 2012
Top
level design pattern: There are four components to the Dynamics AX
SysDataBaseLog incremental ETL package. 1) Prepare, 2) ETL, 3) Error Handling,
and 4) Cleanup. The following diagram outlines the top level design patterns,
pictorially.
Figure 1 – Top level Control Follow Diagram.

- Prepare – Create temporary tables to hold record identifications and a place holder for error information, in case needed.
- ETL – Get the Dynamics AX data from AX to EDW, incrementally.
- Error Handling – Process the errors, if there are any.
- Cleanup – Drop the temporary tables.
<Hint>
Try to avoid using in memory temporary SQL DB table when there is a potential
for large sets of data and table indexes to enhance performance. Create
temporary SQL tables and delete them when not needed. It will improve performance.
In Visual Studio (VS) add a Business Intelligence Integrated
Service Project. In my case, I followed our naming standard and named the
project “Adec.EDW.ETL.Staging”. To setup VS for Business Intelligence
Integrated Service Project refer to “Visual Studio and SQL Business Intelligence”. Rename the default SIS Package to “AX_SysDataBaseLog”.
Setup three project Connection Managers.
AX_Source – Connection Manager to the Dynamics AX DB.
Remote_ProcessingDatabase - Connection Manager to the
Dynamics AX Server DB, where you have Read / Write authority. Same AX Server,
different DB.
Staging – The EDW destination DB.
<Hint> - In my case they are all “Native OLE DB\SQL Server Naïve Client 11.0” Connection Managers.
1)
Prepare. In this design Pattern,
three SQL temporary physical tables are needed to contain the ETL’s source and
destination Record Identifiers, and an Error table for raw data, if needed. Add
a Sequence Container “Prepare-ztmp_Tables”. In the Container add three Execute
SQL Task tools. They can execute in parallel. Name the Execute SQL Task
“Prepare-Local-ztmp”, “Prepare-Remote-ztmp”, and “Prepare-Localztmp-Error”. For
reference, refer to “Figure 1 – Top level Control Follow Diagram”.
1.1)
Select the Execute SQL Task “Prepare-Local-ztmp”. Open it for
edit. Select Connection “Staging”, AKA, EDW Destination. Copy and paste the
following SQL code in the SQL Statement.
--Connection = Staging
IF OBJECT_ID('dbo.ztmp_SysDataBaseLog_IDs')IS NOT NULL
BEGIN
TRUNCATE TABLE [dbo].[ztmp_SysDataBaseLog_IDs];
END
ELSE
BEGIN
CREATE TABLE [dbo].[ztmp_SysDataBaseLog_IDs](
[RECID] bigint NULL,
[RECVERSION] bigint NULL)
ON [PRIMARY];
END

1.2)
Repeat step 1.1 for “Prepare-Remote-ztmp” Execute SQL Task.
With the following setting, connection is “Remote_ProcessingDatabase”, AKA,
Source Server with Read and Write authority, in this case AX server. Copy and
paste the following SQL code in the SQL Statement.
--Connection =
Remote-ProcessDatabase
IF OBJECT_ID('dbo.ztmp_SysDataBaseLog_IDs')IS NOT NULL
BEGIN
TRUNCATE TABLE [dbo].ztmp_SysDataBaseLog_IDs;
END
ELSE
BEGIN
CREATE TABLE [dbo].ztmp_SysDataBaseLog_IDs(
[RECID] bigint NULL);
END
1.3)
Repeat step 1.1 for “Prepare-Localztmp-Error” Execute SQL
Task. With the following setting, connection is “Staging”, AKA, ETL
Destination. Copy and paste the following SQL code in the SQL Statement.
--Connection = Staging
IF OBJECT_ID('ztmp_SYSDATABASELOG_Errors')IS NOT NULL
BEGIN
TRUNCATE TABLE [dbo].[ztmp_SYSDATABASELOG_Errors];
END
ELSE
BEGIN
CREATE TABLE [dbo].[ztmp_SYSDATABASELOG_Errors](
[USERNAME] [nvarchar](60) NOT NULL,
[DESCRIPTION] [nvarchar](60) NOT NULL,
[LOGTYPE] [int] NOT NULL,
[DATA] [varbinary](max) NULL,
[TABLE_] [int] NOT NULL,
[LOGRECID] [bigint] NOT NULL,
[CREATEDDATETIME] [datetime] NOT NULL,
[DEL_CREATEDTIME] [int] NOT NULL,
[CREATEDBY] [nvarchar](8) NOT NULL,
[CREATEDTRANSACTIONID] [bigint] NOT NULL,
[DATAAREAID] [nvarchar](4) NOT NULL,
[RECVERSION] [int] NOT NULL,
[PARTITION] [bigint] NOT NULL,
[RECID] [bigint] NOT NULL,
[SEMTABLENAME] [nvarchar](60) NOT NULL);
END
<Hint>
The error temp table has the same columns as the data source table. We will
discuss the reason in Error Handling section 3.
Execute
the package as it is to create the three tables. Three temp tables will be
needed during the next steps.
ETL: In this section, let us build the components to get the
Dynamics AX data from AX (Source) to EDW (Staging, Destination), incrementally.
2.1) For
reminder, refer to “Figure 1 – Top level Control Follow Diagram”.
2.1)
Add Data Flow Task “Get-AX_Ids” next to “Prepare-ztmp_Tables”
container. Connect the container “Prepare-ztmp_Tables” to “Get-AX_Ids”. In the
prosperity window set “Delay Validation” to True. Because, at later point when
we add the code to drop the temporary tables, the VS indicates erroneous
errors. Select “Get-AX_Ids” and “Edit”. In the VS “Data Flow” TAB add an OLE DB
Source. Name it “AX-Source”. Edit “AX-Source”. Set “OLE DB connection manager”
to “AX-Source”. Set “Data access mode” to “SQL command”. Copy and paste the
following code in the “SQL command text”.
--Connection = AX_Source
SET NOCOUNT ON;
SET TRANSACTION ISOLATION LEVEL READ COMMITTED;
SET DEADLOCK_PRIORITY LOW;
SELECT [RECID], [RECVERSION]
FROM [dbo].[SYSDATABASELOG] WITH (NOLOCK);

<Hint> It is always a
good practice to “Parse Query”, View “Columns”, and check the “Error Output”.
2.2)
Add a “OLE DB Destination” called “Staging_ztmp-Dest”,
connect “AX-Source” and “Staging_ztmp-Dest”.
Select “Staging” for “OLE DB connection manager”, “Table or view – fast
load” for “Data access mode”, and “ztmp_SysDataBaseLog_IDs” temp table for
“Name of the table or the view”.

2.3)
In the VS Control Flow TAB add “Execute SQL Task” tool after
“Get-AX-Ids” and rename it to “Create-Local-Index-ztmp”. Connect the two
components. Edit Create-Local-Index-ztmp”. For “Connection” use “Staging”. Copy
and paste the following code in “SQL Statement”.
--Connection = Staging
IF EXISTS (SELECT name FROM [dbo].[sysindexes] WHERE name = 'idx_SysDataBaseLog_RecID')
DROP INDEX dbo.ztmp_SysDataBaseLog_IDs.idx_SysDataBaseLog_RecID;
CREATE NONCLUSTERED INDEX [idx_SysDataBaseLog_RecID] ON [dbo].[ztmp_SysDataBaseLog_IDs]
(
[RECID] ASC
)
INCLUDE
(
[RECVERSION]
)
WITH
( PAD_INDEX = OFF,
STATISTICS_NORECOMPUTE = OFF,
SORT_IN_TEMPDB = OFF,
DROP_EXISTING = OFF,
ONLINE = OFF,
ALLOW_ROW_LOCKS = ON,
ALLOW_PAGE_LOCKS = ON
)
ON [PRIMARY];

2.4)
Add “Execute SQL Task” tool after “Create-Local-Index-ztmp”
and rename it to “Delete-MissingOrModified”. Connect the two components. Edit “Delete-MissingOrModified”.
For “Connection” use “Staging”. Copy and paste the following code in “SQL
Statement”.
-- Connection = Staging
SET NOCOUNT ON;
DECLARE @DeleteRecID TABLE(
[RECID] bigint NULL);
INSERT INTO @DeleteRecID(
[RECID])
SELECT [s].[RECID]
FROM [dbo].[SysDataBaseLog] [s] INNER JOIN [dbo].[ztmp_SysDataBaseLog_IDs] [a]
ON [s].[RECID] = [a].[RECID]
WHERE [a].[RECVERSION] != [s].[RECVERSION];
INSERT INTO @DeleteRecID(
[RECID])
-- Records that exist in Staging but
no longer exist in AX
SELECT [RECID]
FROM [dbo].[SysDataBaseLog]
EXCEPT
SELECT [RECID]
FROM [dbo].[ztmp_SysDataBaseLog_IDs];
DELETE
FROM [dbo].[SysDataBaseLog]
WHERE [RECID] IN (SELECT [RECID] FROM @DeleteRecID);
2.5)
Add a “Data Flow Task” after “Delete-MissingOrModified”.
Rename it “Request-NewRecords”. Connect the two components. Edit
“Request-NewRecords”.
2.6)
In “Request-NewRecords” Data Flow, add OLE DB Source. Rename
it “Staging-Source”. In “OLE DB connection manager” select “Staging”. In “Data
access mode” select “SQL command”. Copy and paste the following code in SQL
command text.
-- Connection = Staging
SELECT [RECID]
FROM [dbo].[ztmp_SysDataBaseLog_IDs]
EXCEPT
SELECT [RECID]
FROM [dbo].[SysDataBaseLog];

2.7)
Add “Remote_ProcessDatabase-Destination” “OLE DB
Destination”. Connect “Remote_ProcessDatabase-Destination” and
“Staging-Source”. For “OLE DB connection manager” select
“Remote_ProcessingDatabase”. In “Data acces mode” select “Table or view – fast
load”. The “Name of the table or the view” is “ztmp_SysDataBaseLog_IDs”.

2.8)
In the VS Control Flow TAB add an “Insert-NewRecords” “Data
Flow Task” and connect it to “Request-NewRecords”.
Before
editing it, let us explore architecture considerations. In the above, prior to
section 2.8, we have all the components needed for very accurate incremental
data ETL between a data source and destination. The design is extendable,
scalable, and flexible. I am applying the pattern for AX “SysDataBaseLog” table and SQL EDW. You can apply the design to any data
table. It can be used for different tables, data bases, and information
sources.
At this
step (2.8), the “Insert-NewRecords” design pattern is bringing the data from AX
to EDW Staging. Very critical and most vulnerable production execution runtime
thread. In addition, majority of EDW and AX environments are across different
platforms with physical distance between them, e.g., private WAN Networks,
Internet. Henceforth, the ETL fault tolerance and effective event logging are
paramount to a successful design. There are multiple design strategies. In the following design, I outline a fault tolerant
which has proven to be effective with a data trace (datacrumb, like breadcrumb)
for the subsequent event logging design pattern (item 3 in this article). Leave
enough datacrumb for your production support staff, DBA, and production system
Admin to perform root cause analysis. Keep system production support staff
happy and save yourself off-hour’s phone calls.
<Hint>
The datacrumb information is not lost. The subsequent ETL package execution
will get the data from AX to EDW Staging. The datacrumb is used only for production
alerts, production support issues’ root cause analysis, and meeting Service
Level Agreement (SLA) reports.
Single
data source, two attempts to save the data at a different rate, if needed (2nd
attempt to save failed) create the datacrumb, and proceed.
Figure 2 – Top level Fault Tolerance ETL from source to
destination.

Edit the
“Insert-NewRecords”. Add “AX Source” “OLE DB Source” components. Edit “AX
Source”. Select “AX_source” for “OLE DB connection manager”, “SQL command” for
“Data access mode”, and copy and paste the following code in “SQL commend
text”. To limit the data extract, I am brining only what we need.
-- Select log information where the
name is "SALESLINE = 359 or
-- SALESTABLE = 366".
SET NOCOUNT ON;
SET TRANSACTION ISOLATION LEVEL READ COMMITTED;
SET DEADLOCK_PRIORITY LOW;
SELECT [USERNAME]
,[DESCRIPTION]
,[LOGTYPE]
,[DATA]
,[TABLE_]
,[LOGRECID]
,[CREATEDDATETIME]
,[DEL_CREATEDTIME]
,[CREATEDBY]
,[CREATEDTRANSACTIONID]
,[DATAAREAID]
,[RECVERSION]
,[PARTITION]
,[RECID]
,[SEMTABLENAME]
FROM [dbo].[SYSDATABASELOG] WITH (NOLOCK)
where [TABLE_] in (359, 366) -- It is faster than ‘OR’ logic
and [RECID] IN (
SELECT [RECID]
FROM [ADEC_IntegrationSupport].[dbo].[ztmp_SysDataBaseLog_IDs]
);

2.9)
Add “OLE DB Destination” “Staging Destination Bulk Insert”.
Connect “AX Source” and “Staging Destination Bulk Insert”. Edit “Staging
Destination Bulk Insert”. Set the Connection Manager parameters as described
below, pictorially.

Navigate to mapping and then Error Output dialogs. Set the “Error” to “Redirect row”.

2.10)
Repeat step 2.9 for “Staging Destination Row by Row Insert”,
except set “Data access mode” in “Connection Manager” dialog to “Table or
view”.
2.11)
Let us now create the datacrumb. Basically, it is a copy of
the rows that could not be saved. I am putting it in the SQL Table. Proved to
be very effective. If you desire more fault tolerance, place the datacrumb in a
3rd data destination, e.g., highly available shared Drive, SQL,
SharePoint, etc. Does not really matter where the datacrumb is. The Error
handling logic will handle its interface.
Add “OLE DB Destination” and name it “Datacrumb Insert”. Set
the “Connection Manager” and “Error Output” as outlined in the following
pictures.


3)
Error Handling: In VS
“Control Flow” tab add an “Error Handling” container and a “Data Flow Task”
named “Get-Report-Errors” in the container. Connect the “Insert-NewRecords” and
“Error Handling” container.
Edit the “Error Handling”. Before designing the “Error
Handling”, let us discuss architecture.
An error
handling architecture solution must support the production staff with enough
details to perform some system failure analysis. When did the failure happen?
What is its severity? Which components were failing? What is the data at the
time of failure?
I
designed a SQL table to contain production support information. You can extend
it, if you wish. Let us look at the table and its components.
CREATE TABLE [dbo].[ADECBIEVENTLOG](
[EventID]
[int] NOT NULL,
[LogName]
[varchar](256) NOT NULL,
[Source]
[varchar](256) NOT NULL,
[LEVEL]
[int] NOT NULL,
[DATA]
[nvarchar](max) NULL,
[CREATEDDATETIME]
[datetime] NOT NULL
)
[Event ID] – A unique Identifier for the Event.
[Log Name] - A unique
name for the Application Source. Usually is the System Solution company name.
[Source] – Application information. In this case the SSIS
Package information.
[LEVEL] – Microsoft has a well-defined Windows Event Type. I
am reusing the existing integer enumeration. For more details refer to “LogLevel
Enumeration”.
Undefined - Value: 0. Indicates logs at all levels.
Critical - Value: 1. Indicates logs for a critical alert.
Error - Value: 2. Indicates logs for an error.
Warning - Value: 3. Indicates logs for a warning.
Information - Value: 4. Indicates logs for an informational
message.
Verbose - Value: 5. Indicates logs at all levels.
[DATA] – Serialized raw data. I recommend XML Serialization.
It will make data pausing easier for the System Alerts’ tools.
[CREATEDDATETIME] – Event date and time.
3.1)
Add a “Get Error Data OLE DB Source” “OLE DB Source”. Edit it
and Set the “Staging” for the ”OLE DB connection manager”. Select “SQL command”
for the “Data access mode”. Copy and paste the following code in the “SQL
Statement text”.
SELECT
022017 AS [EventID],
'<Your Company>' AS [LogName],
'<Your application information>' AS [Source],
1 AS [Level],
(SELECT[USERNAME]
,[DESCRIPTION]
,[LOGTYPE]
,[DATA]
,[TABLE_]
,[LOGRECID]
,[CREATEDDATETIME]
,[DEL_CREATEDTIME]
,[CREATEDBY]
,[CREATEDTRANSACTIONID]
,[DATAAREAID]
,[RECVERSION]
,[PARTITION]
,[RECID]
,[SEMTABLENAME]
FROM [dbo].[ztmp_SYSDATABASELOG_Errors]
FOR XML PATH('')) AS [DATA],
getdate() AS [CREATEDDATETIME]
FROM [dbo].[ztmp_SYSDATABASELOG_Errors]

3.2)
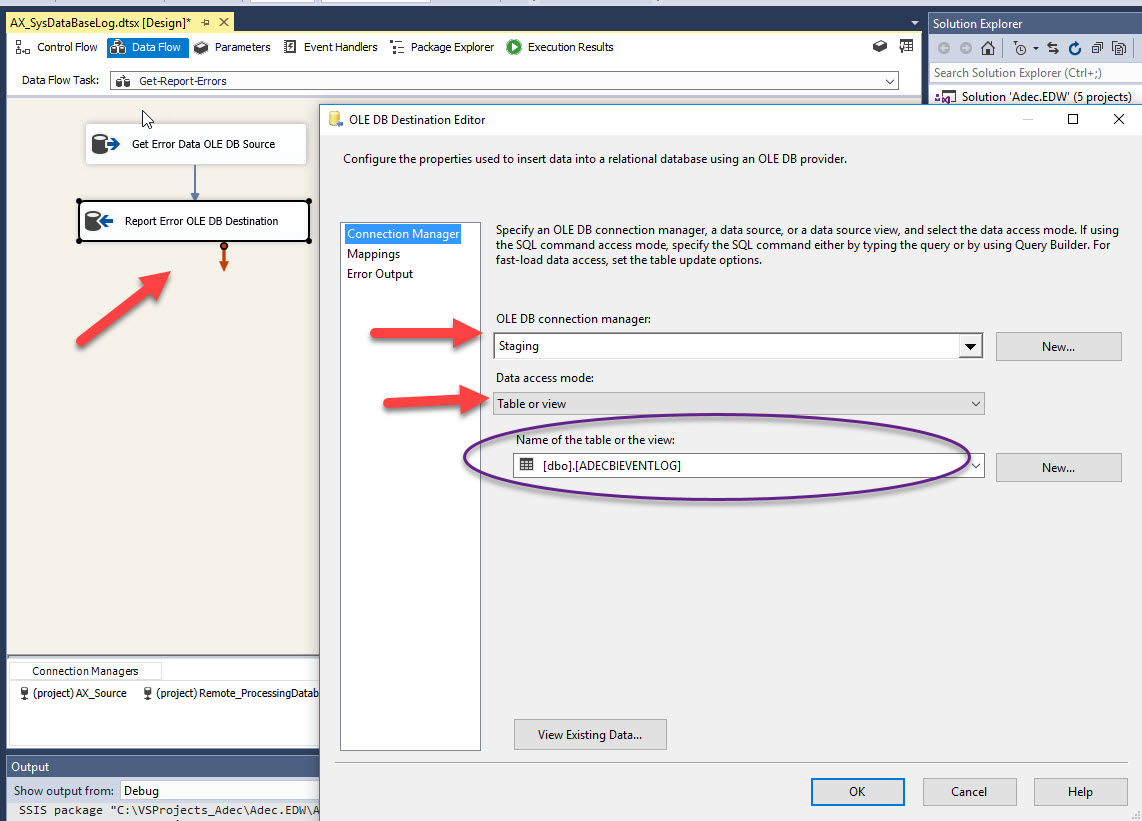
Add “Report Error OLE DB Destination” “OLE DB Destination”.
Connect “Get Error Data OLE DB Source” to “Report Error OLE DB Destination”.
Edit “Report Error OLE DB Destination” and set up its parameter as described
below.
4)
Cleanup: In the Figure one is
referred to as “Drop-ztmp_TablesAndIndexes” container.
The container has three Execute SQL Task components to drop /
delete the temporary tables prior to stop execution.
4.1)
Add “Drop-ztmp_TablesAndIndexes” container. Connect the
“Error Handling” to “Drop-ztmp_TablesAndIndexes” container.
4.2)
In the “Drop-ztmp_TablesAndIndexes” add “Drop-Local_ztmp_Objects”.
Edit it. Set “Connection” to “Staging”. Copy and paste the following code in
the “SQL Statement”.
-- Connection = Staging
IF OBJECT_ID('ztmp_SysDataBaseLog_IDs')IS NOT NULL
DROP TABLE [dbo].[ztmp_SysDataBaseLog_IDs];
IF EXISTS (SELECT name FROM [dbo].[sysindexes] WHERE name = 'idx_SysDataBaseLog_RecID')
DROP INDEX [dbo].[ztmp_SysDataBaseLog_IDs].[idx_SysDataBaseLog_RecID];
<Pix16>
4.3)
In the “Drop-ztmp_TablesAndIndexes” add
“Drop-Remote_ztmp_Objects”. Set its “Connection” to “Remote_processingDataBase”.
Copy and paste the following code in the “SQL Statement”.
IF OBJECT_ID('ztmp_SysDataBaseLog_IDs')IS NOT NULL
DROP TABLE [dbo].[ztmp_SysDataBaseLog_IDs];
4.4)
In the “Drop-ztmp_TablesAndIndexes” add
“Drop-Local_ztmp_Error”. Set its “Connection” to “Staging”. Copy and paste the
following code in the “SQL Statement”.
IF OBJECT_ID('ztmp_SYSDATABASELOG_Errors')IS NOT NULL
DROP TABLE [dbo].[ztmp_SYSDATABASELOG_Errors];
Build the package and test. Design and implementation is
complete.
Here are a few hints and lessons learned. Hope you find them
helpful.
-
To deploy this package to SQL “Integration Service Catalogs”
and setup a SQL Server Agent to execute a Schedule Job refer to “Microsoft Visual Studio, Dynamics AX ETL SSIS Package
Deployment, SQL Security Credential, SQL Proxies, and SQL Job implementation”.
-
During design time, the “Prepare-ztmp_Tables” container must
have run at minimum once, because you will need the temp tables for the OLE DB
Source and Destination components connection.
-
The OLE DB Source and Destination components in VS have no
knowledge of the “Prepare-ztmp_Tables” container. Therefore, during unit
testing, if you observe VS flawed errors around missing table, adjust the
components “Delay Validation” properties to “True”.
-
Why did not I use Windows Standard Event handlers and its
cool “Event Viewer”? My DBA prefers SQL Event Log table. It will give the
production support staffs more flexibility and agility.
-
SysDataBaseLog is a well-designed Microsoft Pattern.
Rightfully to manage its size, the SysDataBaseLog data is in Binary and
compact. There are multiple deserialization strategies. Start by referring to “Accessing
Dynamics AX Containers from SQL” by Abra
Axapta.
My gratitude and thanks to Robert Lefebvre, Steve Moss, and Jen
Niesen. Their inputs, dedications, knowledge, and willingness to collaborate
are among the best. Robert, Steve, Jen and my experiences brought forth the
above architecture and pattern.
I hope the above architecture, design
pattern, and codes help you implement fault tolerant, datacrumb, and effective
error handling system solutions.
“Do what you love, and you’ll
never work another day in your life.” Happy designing.
Cheers, Toraj